Showing posts with label OSPF. Show all posts

Saturday, 9 April 2016

Producing topology diagrams from OSPF database CLI output

I always imagined it should be possible to automatically produce a topology diagram from the information in the OSPF database of a router - in fact I've heard of products that allow you do do this by attaching a device into your network and joining the OSPF domain. For many cases that is too invasive or completely impractical - what would be really nice would be to be able to produce this directly from the CLI output of a "show" command.

After spending a bit of time looking around, I could not find a tool to do this so I went to work using Python and came up with a basic prototype in a couple of hours. The script doesn't actually do the plotting and layout but rather produces a DOT file leaves the heavy lifting to GraphViz. With a little extra work I have now produced a working script which takes the output of "show ip ospf database router" and produces a DOT file which can be used to plot a topology map showing each OSPF router complete with the links between (including metrics) and any transit multi-access networks.

CLI output from Cisco IOS and Cisco ASA is supported (the output seems to be essentially the same) and, obviously, it doesn't matter what vendors' kit is attached into the network, provided you run the "show ip ospf database router" on a supported platform.

The tool, not-so-snappily named "ospfcli2dot" is available from my github: https://github.com/theclam/ospfcli2dot

Example


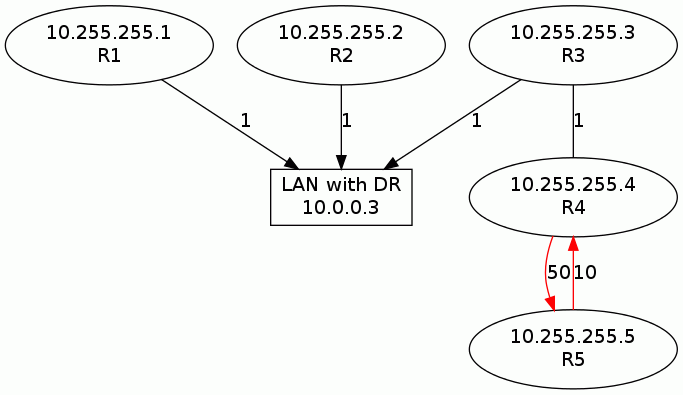
Here's a simple example of a 4 router setup. R1, R2 and R3 all sit on a shared LAN, while R4 is attached point to point to R3 and R5:


The "show ip ospf database router" command can be run from any device in the network since all devices within an area share the same topology database. The output of this is quite verbose so will not be shown here. For the purposes of this example, I have just copied and pasted the output into a file called cli-output.txt.

Simply run the script against that file:

foeh@feeble ~/Projects/ospfcli2dot $ ./ospfcli2dot
ospfcli2dot - takes the output of "show ip ospf database router" and outputs a GraphViz DOT file corresponding to the network topology

v0.2 alpha, By Foeh Mannay, April 2016

Enter input filename: cli-output.txt
Enter output filename: example.dot
foeh@feeble ~/Projects/ospfcli2dot $ dot -Tgif -oexample.gif example.dot


This creates "example.gif", shown below:


As you can see, the metric is shown against each link and the script has automatically highlighted in red that one of the point to point links has different metrics in each direction.


Please give it a try and let me know how you get on!

Links


Download: https://github.com/theclam/ospfcli2dot

Saturday, 4 July 2015

OSPF stuck in EXCHANGE / EXSTART

One problem that occasionally comes up in network troubleshooting, mainly in carrier type environments, is a situation where OSPF refuses to come up to a FULL state and instead just sits in the EXCHANGE state at one end and the EXSTART state at the other. To be fair it's one of those things you've either seen or you haven't, but it's something every network engineer should know.

TL;DR - If you don't care why and just want to fix it: it's ALWAYS an MTU mismatch!

For those who are interested, I'll explain what's happening after a quick review of the OSPF neighbour establishment process. Here's a prettified version of the state table from RFC 2328:


Up until the EXSTART state, all the packets are small and no MTU information is shared so everything works fine. Now, to move from the from the EXSTART state into the EXCHANGE state the two devices must agree on who is master. This is done by each device sending an empty database descriptor (DBD) packet to the other - the devices check each other's DBDs and the device with the highest router ID becomes master.

The problem here is that DBDs contain MTU information and if a DBD is received with a higher MTU than the interface on which it arrived, the DBD is silently dropped as per RFC 2328:

"If the Interface MTU field in the Database Description packet indicates an IP datagram size that is larger than the router can accept on the receiving interface without fragmentation, the Database Description packet is rejected."

So, the device with the larger interface MTU receives a DBD, sends its DBD and is happy enough to move into the EXCHANGE state. The device with the smaller MTU has sent its DBD but has effectively not received one in return so it remains in EXSTART. No matter how many times the DBD with the larger MTU is retransmitted it will never be accepted. Eventually the state times out and we go back to the beginning.

Papering Over the Cracks


In Cisco IOS it is possible to configure ip ospf mtu-ignore under the interface, which drops the MTU check for that interface. This might seem like a good idea, however I wouldn't recommend it. Of course the best practice is to make sure MTUs are consistent across your network, there's not really an excuse to have MTU mismatched across a link! While ignoring the MTU might get the link up, you are storing up problems for later. Aside from the obvious data plane issues (black-holing large packets in one direction) you may also break the control plane.

For example, you could have a configuration that has been in place for months without change and has "always worked" but suddenly, following a link flap, is now stuck in EXCHANGE / EXSTART. Initially when you connect the devices up, the odds are that the LSDB will be small. At that point, the mismatched MTU will not cause problems and the neighbour will establish fine. Later on in life, though, the LSDBs will be full and the DBDs larger, until the device with the larger MTU has a big enough LSDB update to fill an over-sized packet which its partner can't handle. Then the state gets all screwed up and neighbours reset... bad times!

Debugging


If you're stuck in EXCHANGE / EXSTART but you're still not convinced it's MTU (or if you're trying to inter-op and your two devices use different conventions to define MTU) you can use debugs to confirm what's going on.

The key one here for Cisco IOS is "debug ip ospf adj", which produces output as shown below:

*Jul 4 22:04:23.979: OSPF-1 ADJ Fa0/0: 2 Way Communication to 10.4.4.254, state 2WAY
*Jul 4 22:04:23.983: OSPF-1 ADJ Fa0/0: Nbr 10.4.4.254: Prepare dbase exchange
*Jul 4 22:04:23.983: OSPF-1 ADJ Fa0/0: Send DBD to 10.4.4.254 seq 0x1D43 opt 0x52 flag 0x7 len 32
*Jul 4 22:04:24.011: OSPF-1 ADJ Fa0/0: Rcv DBD from 10.4.4.254 seq 0xA0CF5CC opt 0x52 flag 0x7 len 32 mtu 1500 state EXSTART
*Jul 4 22:04:24.011: OSPF-1 ADJ Fa0/0: Nbr 10.4.4.254 has larger interface MTU
*Jul 4 22:04:28.435: OSPF-1 ADJ Fa0/0: Rcv DBD from 10.4.4.254 seq 0xA0CF5CC opt 0x52 flag 0x7 len 32 mtu 1500 state EXSTART
*Jul 4 22:04:28.439: OSPF-1 ADJ Fa0/0: Nbr 10.4.4.254 has larger interface MTU
*Jul 4 22:04:28.623: OSPF-1 ADJ Fa0/0: Send DBD to 10.4.4.254 seq 0x1D43 opt 0x52 flag 0x7 len 32
*Jul 4 22:04:28.623: OSPF-1 ADJ Fa0/0: Retransmitting DBD to 10.4.4.254 [1]
[...]
*Jul 4 22:06:27.955: OSPF-1 ADJ Fa0/0: Rcv DBD from 10.4.4.254 seq 0xA0CF5CC opt 0x52 flag 0x7 len 32 mtu 1500 state EXSTART
*Jul 4 22:06:27.955: OSPF-1 ADJ Fa0/0: Nbr 10.4.4.254 has larger interface MTU
*Jul 4 22:06:28.147: OSPF-1 ADJ Fa0/0: Killing nbr 10.4.4.254 due to excessive (25) retransmissions
*Jul 4 22:06:28.147: OSPF-1 ADJ Fa0/0: 10.4.4.254 address 10.4.4.254 is dead, state DOWN
*Jul 4 22:06:28.151: %OSPF-5-ADJCHG: Process 1, Nbr 10.4.4.254 on FastEthernet0/0 from EXSTART to DOWN, Neighbor Down: Too many retransmissions
*Jul 4 22:06:28.151: OSPF-1 ADJ Fa0/0: Nbr 10.4.4.254: Clean-up dbase exchange
*Jul 4 22:06:32.555: OSPF-1 ADJ Fa0/0: Nbr 10.4.4.254 10.4.4.254 is currently ignored


On IOS-XR we have "debug ospf instance-id adj", which returns the same output.

On Juniper JunOS we can configure "set protocols ospf traceoptions flag database-description" which produces the output below:


Jul 4 22:04:41.813313 OSPF rcvd DbD 10.4.4.99 -> 10.4.4.254 (vlan.0 IFL 69 area 0.0.0.0)
Jul 4 22:04:41.814387 Version 2, length 32, ID 10.4.4.99, area 0.0.0.0
Jul 4 22:04:41.814466 checksum 0x0, authtype 0
Jul 4 22:04:41.814566 options 0x52, i 1, m 1, ms 1, r 0, seq 0x1d43, mtu 1492
Jul 4 22:04:41.815182 RPD_OSPF_NBRUP: OSPF neighbor 10.4.4.99 (realm ospf-v2 vlan.0 area 0.0.0.0) state changed from Init to ExStart due to 2WayRcvd (event reason: initial DBD packet was received)
Jul 4 22:04:41.815388 1400 Max dbd packet
Jul 4 22:04:41.815763 OSPF sent DbD 10.4.4.254 -> 224.0.0.5 (vlan.0 IFL 69 area 0.0.0.0)
Jul 4 22:04:41.815889 Version 2, length 32, ID 10.4.4.254, area 0.0.0.0
Jul 4 22:04:41.815970 options 0x52, i 1, m 1, ms 1, r 0, seq 0xa0cf5cc, mtu 1500
Jul 4 22:04:46.254104 OSPF resend last DBD to 10.4.4.99
Jul 4 22:04:46.254753 OSPF sent DbD 10.4.4.254 -> 224.0.0.5 (vlan.0 IFL 69 area 0.0.0.0)
Jul 4 22:04:46.254861 Version 2, length 32, ID 10.4.4.254, area 0.0.0.0
Jul 4 22:04:46.254966 options 0x52, i 1, m 1, ms 1, r 0, seq 0xa0cf5cc, mtu 1500
Jul 4 22:04:46.447212 OSPF rcvd DbD 10.4.4.99 -> 10.4.4.254 (vlan.0 IFL 69 area 0.0.0.0)
Jul 4 22:04:46.447359 Version 2, length 32, ID 10.4.4.99, area 0.0.0.0
Jul 4 22:04:46.447439 checksum 0x0, authtype 0
Jul 4 22:04:46.447584 options 0x52, i 1, m 1, ms 1, r 0, seq 0x1d43, mtu 1492
Jul 4 22:04:50.313983 OSPF resend last DBD to 10.4.4.99
[...]
Jul 4 22:06:45.737775 OSPF sent DbD 10.4.4.254 -> 224.0.0.5 (vlan.0 IFL 69 area 0.0.0.0)
Jul 4 22:06:45.737882 Version 2, length 32, ID 10.4.4.254, area 0.0.0.0
Jul 4 22:06:45.738103 options 0x52, i 1, m 1, ms 1, r 0, seq 0xa0cf5cc, mtu 1500
Jul 4 22:06:50.336478 OSPF resend last DBD to 10.4.4.99
Jul 4 22:06:50.337124 OSPF sent DbD 10.4.4.254 -> 224.0.0.5 (vlan.0 IFL 69 area 0.0.0.0)
Jul 4 22:06:50.337291 Version 2, length 32, ID 10.4.4.254, area 0.0.0.0
Jul 4 22:06:50.337414 options 0x52, i 1, m 1, ms 1, r 0, seq 0xa0cf5cc, mtu 1500
Jul 4 22:06:54.868260 RPD_OSPF_NBRDOWN: OSPF neighbor 10.4.4.99 (realm ospf-v2 vlan.0 area 0.0.0.0) state changed from ExStart to Init due to 1WayRcvd (event reason: neighbor is in one-way mode)

References

RFC2328


Thursday, 3 October 2013

BGP support added to dechap

Hot on the heels of adding the ability to attack OSPF MD5 authentication, I've added BGP support to dechap. It is now possible to feed a pcap file with PPPoE, L2TP, RADIUS, OSPF and BGP packets to the same tool and perform offline dictionary attacks on the authentications within.

As usual, if you're not interested in the theory just skip right to the end for the download link.

TCP MD5 Signatures

BGP authentication uses the MD5 Signature TCP option field, which is defined in RFC 2385. Personally, I found this RFC very vague and it took a lot of iterations to get the technique right. It's particularly fuzzy about what is included in the hash, what isn't and how to present values correctly. I'm hoping to document the process a little more clearly for the next poor guy who tries to implement it as I couldn't find a sufficiently detailed reference anywhere.

RFC 2385 states that the hash must be calculated over the following:

1. the TCP pseudo-header (in the order: source IP address,
   destination IP address, zero-padded protocol number, and
   segment length)
2. the TCP header, excluding options, and assuming a checksum of
   zero
3. the TCP segment data (if any)
4. an independently-specified key or password, known to both TCPs
   and presumably connection-specific

Now, maybe it's just me, but this raised a lot of questions in my mind. Zero padding usually means to fill the trailing space with zeros, but padding the second byte would effectively multiply the protocol number by 256 so should it be a leading zero? Which headers and options are included in the "segment length"? Should the pad bytes be copied with the TCP header?

Through a lot of trial and error I found that:
  • The zero padding goes before the protocol number
  • The "segment length" includes the TCP header, the TCP options (including room for the MD5 signature option being calculated) and the actual payload data
  • The copied TCP header should be 20 bytes long, i.e. includes two padding bytes after the (zeroed out) checksum. The header length remains as-is, including the length of the options.
  • The TCP segment data starts immediately after the TCP options and runs to the last byte indicated by the IP length field
  • The null byte terminating the password is not passed to the hash algorithm
 The resulting hash value is then stored inside the MD5 signature option (kind 19, length 18).

Checking / Attacking BGP Packets

Using the above method it is straightforward to run a dictionary attack as follows:


  • Start with a sniffed BGP packet (see the original dechap blog post for info on how this is extracted).
  • Extract and store the authentication hash (look for option kind 19) for later comparison
  • Put together the "pseudoheader" as described above
  • Append the TCP header without options
  • Append the TCP payload
  • Append the candidate password
  • Calculate the MD5 hash over the complete data set and compare to the value seen in the sniffed packet. A matching hash indicates a matching password.
As of v0.4a, dechap can now be used to automate this process.

Obtaining the Tool

The C source code may be downloaded from: https://github.com/theclam/dechap

Provided the OpenSSL dev libraries are installed it should be possible to simply extract the source code, cd into the directory then run "make". I've only tested this under Ubuntu Linux but there are very few dependancies so I would imagine it will work on most distributions.

Using the Tool

As usual - this is for legitimate audit and recovery purposes and must not be used for any kind of malicious activity.

The usage is pretty straightforward - there are only two parameters and both are mandatory. Specify your capture file (original pcap format) with the -c flag and your word list with the -w flag. Here's an example:

lab@lab:~/dechap$ ./dechap -w mywords.txt -c bgp.cap
Found password "password1" for TCP from 10.0.0.2 to 10.0.0.1.
Found password "password1" for TCP from 10.0.0.1 to 10.0.0.2.
Found password "password1" for TCP from 10.0.0.2 to 10.0.0.1.
lab@lab:~/dechap$
I'm not sure how quickly it runs but it doesn't seem quite as quick as the OSPF version. I suppose BGP packets tend to be a little bigger than OSPF so there's more to hash. You can improve the speed by only including one packet for each source / destination pair in each capture as, at present, it doesn't check for multiple packets between pairs and attacks each instance individually.

If you try this out, please leave a comment on this post with your experiences - good or bad. Any suggestions would also be welcome, particularly for other protocols to attack.

References

RFC2385 - Protection of BGP Sessions via the TCP MD5 Signature Option
RFC1321 - The MD5 Message-Digest Algorithm


Wednesday, 2 October 2013

Offline Attack on MD5 keys in captured OSPF packets

A few months ago I released a tool called dechap which finds PPPoE, L2TP and RADIUS authentications in pcap files and performs dictionary attacks against them. Since writing dechap I've always thought it would be more useful if it were able to do a similar thing with OSPF packets.

Well, the good news is that I've finally got around to adding OSPF support to dechap! Woo and yay! If you just want the tool, scroll straight to the bottom. If you're interested in the theory, read on.

OSPF Authentication Basics

OSPF, or more accurately OSPFv2 as defined in RFC2328, has three options for authenticating incoming packets:

Null: no authentication is performed at all.

Password: a plaintext password is added in the clear to each OSPF packet. If the password contained in an incoming packet matches the one configured locally then the packet is considered valid and is processed, otherwise it is silently ignored.

Message Digest: an MD5 hash is calculated over a combination of the OSPF packet contents and the password. The hash output is then added to the OSPF packet before transmission. When a packet arrives, the receiving router computes an MD5 hash of the packet contents plus its locally stored password. If the calculated hash matches the one attached to the incoming packet then the check passes and the packet is processed; otherwise it is silently dropped.

Note that this is authentication only - in other words the password only serves to verify that the packet contents are authentic. It does not offer privacy, so all the information within the packet is visible  in the clear.

OSPF MD5 Authentication Detail

One thing I found unclear in RFC 2328 was exactly what data the MD5 hash was calculated over. The RFC states:

Input to the authentication algorithm consists of the OSPF packet and the secret key.

... and clarifies that:

(a) The 16 byte MD5 key is appended to the OSPF packet.

(b) Trailing pad and length fields are added, as
    specified in [Ref17].

(c) The MD5 authentication algorithm is run over the
    concatenation of the OSPF packet, secret key, pad
    and length fields, producing a 16 byte message
    digest (see [Ref17]).

(d) The MD5 digest is written over the OSPF key (i.e.,
    appended to the original OSPF packet). The digest is
    not counted in the OSPF packet's length field, but
    is included in the packet's IP length field. Any
    trailing pad or length fields beyond the digest are
    not counted or transmitted.

Confusingly, Ref17 refers to RFC1321, which defines the MD5 algorithm. MD5 defines a method to pad the input before the hash is calculated, so it's easy to assume that point (b) refers to that - it doesn't. I spent a couple of hours trying to work out why my hashes were coming out to the wrong value before finally figuring it out. To aid others, I've taken the liberty of rewriting the instructions so that they can be understood by thickos such as myself:

Calculating the MD5 Hash

In order to calculate the correct MD5 hash, the following method should be used:

(a) Build the OSPF packet as normal, ensuring that the key number and authentication sequence number are populated. The OSPF length field must contain the total number of bytes in the packet at this point. The checksum must be set to zero.

(b) The authentication key / password in plaintext must be adjusted to exactly 16 bytes, i.e. if the key is longer than 16 bytes then it must be truncated, shorter keys must be padded with null (0x00) bytes until 16 bytes long. The resulting 16 byte "modified authentication key" is then appended to the packet.

(c) The MD5 hash must be calculated over the entire result, i.e. the original OSPF packet plus the 16 byte modified authentication key.

(d) The resulting hash is then written over the modified authentication key in the last 16 bytes of the packet.

Testing / Attacking OSPF Packets

Using the above method it is straightforward to run a dictionary attack as follows:


  • Start with a sniffed OSPF packet (see the original dechap blog post for info on how this is extracted).
  • Extract the original OSPF packet (start immediately after the IP header and continue up to the length specified in the OSPF header)
  • Extract and store the authentication hash (the 16 bytes following the packet) for later comparison
  • Zero out the checksum
  • For each candidate password, pad or truncate to 16 bytes and append to the original OSPF packet. 
  • Calculate the MD5 hash as described above and compare to the value seen in the sniffed packet. A matching hash indicates a matching password.
As of v0.3a, dechap can now be used to automate this process.

Obtaining the Tool

The C source code may be downloaded from: https://github.com/theclam/dechap

Provided the OpenSSL dev libraries are installed it should be possible to simply extract the source code, cd into the directory then run "make".

Using the Tool

As usual - this is for legitimate audit and recovery purposes and must not be used for any kind of malicious activity.

The usage is pretty straightforward - there are only two parameters and both are mandatory. Specify your capture file (original pcap format) with the -c flag and your word list with the -w flag. Here's an example:

lab@lab:~/dechap$ ./dechap -w mywords.txt -c ospf-bcast.cap
Found password "password1" for user OSPF host 10.1.1.1 key 1.
Found password "password1" for user OSPF host 10.1.1.2 key 1.
Found password "password1" for user OSPF host 10.1.1.1 key 1.

lab@lab:~/dechap$

I haven't tried any serious benchmarks for this but it seems reasonably fast. In a worst case scenario (correct key not present) on my creaky old Athlon XP 2100 it can try 100k passwords in under 100ms.

If you try this out, please leave a comment on this post with your experiences - good or bad. Any suggestions would also be welcome (yes, I know BGP exists).

References

RFC2328 - OSPF Version 2
RFC1321 - The MD5 Message-Digest Algorithm


Thursday, 22 November 2012

tshark one-liners

Since most of the hits on this blog seem to come from tshark filter related searches, and since I spend a good part of my day either running or analysing packet captures, I thought it might be useful to create a series of "tshark one-liners" in homage to the brilliant "sed one-liners" collection compiled by Eric Pement.

These are capture filters, not display filters, and are equally applicable to Wireshark, tshark and tcpdump, since they all use the same pcap filter syntax. In wireshark the capture filter options are now hidden away and you have to double click on the interface under capture options to set or adjust the filter string.

The filters are broadly grouped by purpose and I will try to add more as I think of them. Please comment if there is something you think I have missed or would like added.

Note: if you want to strip off VLAN, MPLS, PPPoE or GRE headers from an existing pcap file, please see this post: Removing VLAN/MPLS/PPPoE/GRE Encapsulation

Ethernet

Match 802.1D spanning tree:
"ether dst 01:00:c2:00:00:00" (manpages say "ether proto stp" but I've had trouble with that)

Match Cisco PVST+:
"ether dst 01:00:0c:cc:cc:cd"

Match Cisco CDP / VTP / DTP / PAgP / UDLD:
"ether dst 01:00:0c:cc:cc:cc"

Match LLDP:
"ether proto 0x88cc"


Match LACP (slow protocols):
"ether dst 01:80:c2:00:00:02"

General IP
Match host A (10.0.0.1) communicating with host B (192.168.0.1):
"host 10.0.0.1 && host 192.168.0.1"

Match host A (10.0.0.1) communicating with anything on network B (192.168.0.0/24):
"host 10.0.0.1 && net 192.168.0.0/24"
or, if you don't like CIDR notation:
"host 10.0.0.1 && net 192.168.0.0 mask 255.255.255.0"

Match ARP:
"ether proto 0x0806"

Match DHCP:"udp port 67 || udp port 68"

VLANs

Match any traffic with at least one VLAN tag:
"vlan"

Match traffic with exactly one VLAN tag:
"vlan && not vlan"

Match traffic with an SVLAN of 100 and any CVLAN:
"vlan 100 && vlan"

Match traffic where the first VLAN tag has an 802.1p marking of:
0: "vlan && ether[14] & 224 == 0"
1: "vlan && ether[14] & 224 == 32"
2: "vlan && ether[14] & 224 == 64"
3: "vlan && ether[14] & 224 == 96"
4: "vlan && ether[14] & 224 == 128"
5: "vlan && ether[14] & 224 == 160"
6: "vlan && ether[14] & 224 == 192"
7: "vlan && ether[14] & 224 == 224"

Note: to match the second VLAN tag use "vlan && vlan && ether[18] & 224" on the left hand side of the equality.

MPLS

Match traffic with at least one MPLS label:
"mpls"

Match traffic with exactly one MPLS label (match S bit of first label):
"mpls && ether[16] & 1 == 1"

Match traffic with a first or single label of 12345:
"mpls 12345"

Match traffic with an inner (e.g. service) label of 67890:
"mpls && mpls 67890"

Match traffic with exactly three MPLS labels (e.g. traffic on facility bypass FRR):
"mpls && mpls && mpls && ether[24] & 1 == 1"

Match 6PE traffic:
With transport label: "mpls && mpls 2"
Without transport label (after PHP): "mpls 2"

Match traffic with an EXP marking (on the first label) of:
0: "mpls && ether[16] & 14 == 0"
1: "mpls && ether[16] & 14 == 2"
2: "mpls && ether[16] & 14 == 4"
3: "mpls && ether[16] & 14 == 6"
4: "mpls && ether[16] & 14 == 8"
5: "mpls && ether[16] & 14 == 10"
6: "mpls && ether[16] & 14 == 12"
7: "mpls && ether[16] & 14 == 14"

Note: to match the EXP marking of the second label, use "mpls && mpls && ether[20] & 14" on the left hand side of the equality.

Multicast

Match any Ethernet multicast:
"ether multicast"

Match IP multicast traffic:
"ip multicast"

Match IGMP traffic:
"ip proto 2" (the manpages say "ip proto igmp" but I've had trouble with that)

Match PIM traffic:
"ip proto 0x67" (the manpages say "ip proto pim" but I've had trouble with that)

OSPFv2

Match all OSPF:
"ip proto 89"

Match specific OSPF packet types:
Hello: "ip proto 89 && ip[20:2] == 0x0201"
DBD: "ip proto 89 && ip[20:2] == 0x0202"
LSR: "ip proto 89 && ip[20:2] == 0x0203"
LSU: "ip proto 89 && ip[20:2] == 0x0204"
LSA: "ip proto 89 && ip[20:2] == 0x0205"

IS-IS

Match all IS-IS traffic:
"isis"

Match specific IS-IS PDU types:
"l1", "l2", "iih", "lsp", "snp", "csnp" or "psnp"

BGP

Note: These rules do not handle multi-segment messages very well but they are good enough for most purposes.

Match only BGP OPEN messages:
"tcp port 179 && tcp[50] == 1"

Match only BGP UPDATE messages:
"tcp port 179 && tcp[50] & 5 != 0"

Match only BGP NOTIFICATION messages:
"tcp port 179 && tcp[50] == 3"

Match only BGP KEEPALIVE messages:
"tcp port 179 && tcp[50] == 4"

 L2TP

Match only L2TP control messages:
"udp port 1701 && udp[8:2] & 0x80ff == 0x8002"

Match L2TP control messages for tunnel ID 1234:
"udp port 1701 && udp[8:2] & 0x80ff == 0x8002 && udp[12:2] == 1234"

Match L2TP data messages for tunnel ID 1234:
"udp port 1701 && udp[8:2] & 0x80ff == 0x0002 && udp[10:2] == 1234"

Match L2TP control messages for session ID 5678:
"udp port 1701 && udp[8:2] & 0x80ff == 0x8002 && udp[14:2] == 5678"

Match L2TP data messages for session ID 5678:
"udp port 1701 && udp[8:2] & 0x80ff == 0x0002 && udp[12:2] == 5678"

PPPoE

Note: Offsets will need to be manually increased by 4 bytes  for each VLAN tag or MPLS label present.

Match PPPoE discovery phase (PADI / PADO / PADR / PADS / PADT):
"pppoed"

Match PPPoE session phase (i.e. PPP traffic):
"pppoes"

Match PPPoE LCP messages:
"pppoes && ether[20:2] == 0xc021"

Match PPPoE CHAP authentication messages:
"pppoes && ether[20:2] == 0xc223"